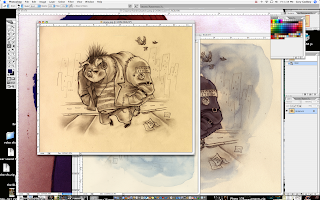
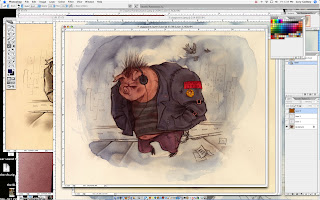
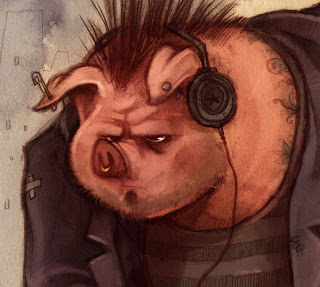
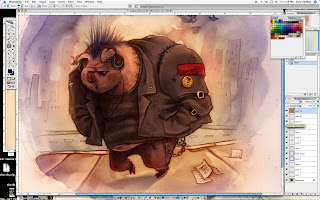
the photoshop experiment

how it is I do whatever it is I think I do.

Friday, May 16, 2008

Surly Pigglet

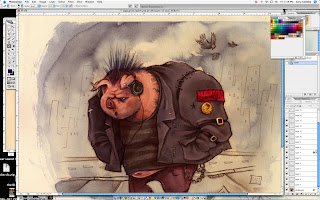
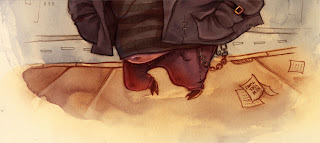
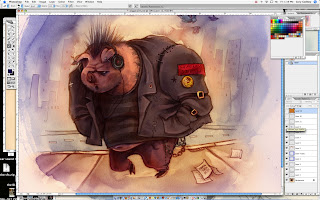
Behold, the surly pig, in stages of completion.

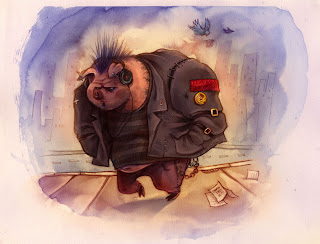
Life has never been easy for this pig.
Between acting like a sullen cry-baby and working at Starbucks, his world is tough.

His wideness does nothing to help his negative self image. He's tortured, really. It's the cookie corporation's fault for making cookies taste so good.

Man.

Commentary coming. If any one has any speficic questions feel free to leave them in comment form.

_________________________________________


Monday, May 12, 2008

thoughts for features

This Friday we'll have a new demo up. I'm thinking of this surly porker. I believe I've got versions with all the layers.

I want to take into consideration what you guys would like to see. Anything specific? In the past I've thought of this blog as sort of a archive of work. A place for new work yes, but as it stands I feel like I've covered the way I operate pretty throughly. There's nothing to tricky or complicated about the way I use photoshop.

Anyway, just leave a comment if there's something you'd like to see or any questions you may have.

Thanks!

Friday, May 09, 2008

Charlie.


Here we are. A drawing of someone named Charlie. I have no idea who Charlie is.


I painted Charlie's jacket with a brown sort of color on Multiply then turned the opacity down about 50%


I filled the piece with a layer of a reddish Soft Light again, at about 50%


Charlie's skin tone goes in. Multiply on 70 %. I did more opacity changing with this one, more because I wanted to give the pencil a change to work.


I gave the skin a little life with Soft Light.


I cleaned up the pencil work just a touch with a layer of Screen.


I was liking the way it looked so I pushed the pencil on the face back just a touch with a layer of Lighten around 50 %


I strengthened the hair and eyes a little with a layer of Multiply.


The pencil on the face felt a little too strong still, so I pushed it back with skin tone on a layer of Normal, low opacity.


A little blue rim light with Screen.


And for the kill. A final layer of Soft Light at %100 to warm it all up.

____________________________________________


I did this drawing a while ago at work during a down time. I painted it a couple days later just for fun. No big reason. If you are interested in the reference I used for old Charlie here, you check see it here.

Thursday, May 08, 2008

Behold.


There'll be one a week, every Friday.

It's surprising how easy it is to do something when you mean to do it. And I mean to do it. I've meant to be more consistent here and it's worked.

Laugh if you will. Scoff and jeer, but it'll come to pass.

Unless Greenville explodes that is. Or vanishes like Atlantis. In which case, if it vanishes we'll probably be in for a cool ride. I'll write about from the future.

Wednesday, August 29, 2007

mr. goblin fellow; a short demo


________________________________________


A drawing with some watercolor on top of it.


A layer of Multiply to fill out the hazardously applied watercolor.


Some Screen for highlights...


Some Soft Light to warm things up a touch.


I knocked out the face just a little with a layer of Screen...


A layer of Color to deaden the face and pull back on the warmness.


Some darkening with Multiply...


Subtle line around the figure with Screen.


Screen highlights on the jacket...


Warming it up again with Soft Light.

________________________________________

Thursday, August 23, 2007

Store!


The New, Improved-- PORTLAND STUDIOS STORE! Who would like a t-shirt? I know I the heck would. Finally.

Below are three even bigger pictures than on the real site of my currently available designs:


Buy em!

Tuesday, August 21, 2007

Chapter 2: The Scavenger

Here's an example of taking a thumbnail to finish.

This particular example is from Jack & Inar, written and illustrated by your very own humble The Photoshop Experiment proprietor, set for publication in early 2008. Check back for updates.

never you mind this. ^

Anyway, on to the demo:


_____________________________________


the thumbnail.


Here's the finished drawing. The video below documents the process.


And here's the trick, watercolor painting on top of the drawing.

_____________________________________


Turning it all to B/W.


Adding some more shadows.

_____________________________________


Notice the addition of light with a fine layer of Screen.

_____________________________________


I used a later of Lighten and turned down the opacity some to push this running guy into the back some more.


Finally, a layer of Soft Light, low opacity to achieve the sepia look the book possesses.
_____________________________________

Thursday, March 15, 2007

blue horns: the new demo

Haven't got a chance yet to write notes for this new demo yet-- hopefully tomorrow.
In anycase, here's the new piece. A goat. With blue horns.


* * *

[one note: below is the pencil drawing watercolored for texture + a little photoshop multiply for some extra values]


* * *


revived

Bringing back the T.P.E.
New demo coming:

Monday, October 09, 2006

dear folks, + the promised scarecrow(s)... in LAYERS!

Dear folks, I have been very deliqwent in letting TPE go so bad, and I do apologize to the faithful daily checkers (I know you are out there, I have a Stat Counter :)

Work has been very busy as of late, however it has paid off and as a direct result, a sizeable amount for an equally sizeable job just came through and I am blogging to you via a lovely 20 in. iMac. It is quite a step up from the 15 in. eMac I worked on for 4 years and I am very pleased.

In anycase, I dug and dug and found that I have TWO scarecrows and in layers, so here they be. In all their looking for trouble scariness:

Click all both the pictures above and you can download the .PSDs and look through the layers at your leeeeeeizzure. Feel free to ask any questions and I'll do what I can to answer them.

~enjoy,
the deliqwent proprieter of TPE.

Thursday, September 14, 2006

new demo Friday [tomorrow]


I'm pretty sure I've got a layered version somewhere.

Friday, September 01, 2006

Pumpkin Pumpkin in the Sky

This started as a little watercolor that I did for a story for my then girlfriend, now wife. If you want to see the rest of the pictures in the story, click here for Peter, Peter: a Story in Pictures.

It just might give this a little more context.

_______________________________________


Above is the original watercolor. Taped to a board with tape and painted with real Windsor-Newton watercolors and brush. That was a while ago, but the other day I wanted to finish it.


Added some blue to the clouds with Multiply.


Then I put in some warm highlights to the clouds with Screen.


Added a shadow around the image with Multiply. Just seemed to warm it up.


Put in some more blue value in the sky with Multiply.


Then I unified the colors with a layer of Color and turned the opacity way down, like to 30% er something.


I dropped in a watercolor texture in Soft Light...


And done. At some point I dropped in a paper texture and turned it down low: http://www.mayang.com/textures/
They have good quality pictures and textures.

By the end I usually flatten the picture and take a copy and work right on it and touch things up. I changed his face a little and touched in a few highlights.

Monday, August 28, 2006

This Friday: the pumpkin

Demo this Friday.

Friday, August 18, 2006

The boy~ with color


The context for the boy. He is the "Jack" of Jack and Inar, a book of my own writing, nearly finished. Inar not being pictured here. To Jack's left is Dr. Arthur Loveless and to his right is Adolphus M. Grimble.

In anycase, Jack always carries two matches in his pocket.

But that's not why were here.


Jack. With and without.


And then here....


Ok, the above picture, I colored his face/hands w/ a layer of Multiply and over it all layed a layer of a warm, dull red layer of Soft Light.


Here's what throws people. I colored his shirt in Multiply....


....copied the layer, changed the setting to Soft Light, made the color a little darker and redder. That's about it. For some reason everyone I've ever shown that too in real life has not believed me.


The hat and the pants followed the same idea of the shirt as far as coloring go.


A layer of Color with the opacity turned way down to unify the colors.


Colored the bag and such.....


Added shadows in Multiply.


More color balancing...


Cleaned up the edges with a layer of Screen.


Added some important highlights in Screen.


Notice the blue layer, and the warm red, both are Screen layers. Lighting.


And just another layer of a way low opacity Screen layer of orange for lighting.

And that's about it.

Thursday, August 17, 2006

This Friday [tomorrow]:

The demo of a quick one. I think it took all of 20 minutes.

Hopefully I'll be able to explain the weird way I color things with alternating Multiply and Soft Light layers because everyone I have talked with in real life and tried to show has always looked at me funny and walked away. Oh well.


Friday, August 11, 2006

Jesse's Song

This was basically just for fun, the real piece just has flat color background, no texture.

It's some interior album art for this children's album by an independent recording artist in Nashville, TN. Visit my main blog and dig around in the recent past for more posts on the artwork for this project.

I threw a watercolor texture over it and played with the layers.

__________________________________________________

Here's what I ended up with.
__________________________________________________

This is the orginal drawing. A lot of smudging the pencil around, so it's got some texture already. I picked out a few highlights with a layer of Screen but mostly, this is the original.


I put a layer of Color over it, and turned down the opacity just to change the color of the lines.


Just messing, I did another a layer of yellow to warm it up.


And added a layer of a green to the background, the boy and the bed erased out.


This is where it starts to look cool~ I dropped in a scanned watercolor texture I had made and copied a couple times, setting it to Hard Light. Experimentation is the key for this. It's a weird layer setting.


Then, just to nudge the color a bit, I dropped a layer of purple Soft Light over it all.

Pretty simple, but I think it looks cool. To me, a realistic texture and traditional feel is what gives digital work credibility.
__________________________________________________

Here's another piece for the same album that I did basically the same texture work to.

Wednesday, August 09, 2006

Coming soon

Sorry I've been out and neglected the poor Experiment. Do forgive.
New demo coming this week:


Check back Friday.

Thursday, June 15, 2006

a little bird watching


The Bird Watcher
has its roots back in a weird drawing I did in college (below) of a troll with wings and a top hat. I always liked it and just wanted to do something with it again.
-----------------------------------------------------------------------------------------------------------


So, another doodle. There was a lot of these but this was the most... appropriate. I think.


And then the drawing to scan.


And this is where you will just have to believe. I don't have a file with the layers, so, oh well. just believe it. Geez. It was probably just mostly a lot of Normal and Multiply with some Softlight for color. Plus a beard.


Adding shadows w/Multiply... Notice Justin wearing the hat reference.


and the face. boo.


Here's some softlight of yellow on the right for some sunny joy and some blue on the left for... whatever.


more shadows w/Multiply..... plus a probably a little line drawing.


and.......... why not.


Now, more reference. Notice too that I make the canvas really wide for... whatever reason. I just do. In any case I can put my reference on there and pull colors if I like.


Working on the arm with Multiply...


Painting the folds in the sleeve here, with a layer of Normal.


And tightening things up, w/Normal. Basically just drawing over things till I like it.


don't freak out. the hat is about to change. I use the Liquify tool from time to time.


Hat + scarf.


And highlights on the scarf....


Just the sky. I wanted it to go from warm to cool, added on a Normal layer. And the bricks were probably a lot of layers of Normal.


HIGHLIGHT on the rim of the hat. For me it is moments like this that make everything worth it.


BLAM- we got shoulder bird. Just careful brushing and some various layers of Normal and Softlight.


I like to do a color w/Multiply over it sometimes because it seems to hold things together.


Darks in Normal.


Screen in some highlights unless you are that guy who can't handle it.


Just cleaning up w/Normal


Yellow bushes... put there with Normal, and darkened with Multiply.


Screen in the blue in the sky (unless....)


KABLAM~ and there was dark.


And then, just a textured sky. And a city. Oh yeah, and I did the wings. Again, probably just a lot of Normal and Softlight with a textured brush.


The Bird Watcher.

Tuesday, June 13, 2006

coming this week...

the demo of this bird watcher:

Monday, May 29, 2006

Round 2

The city can be a jungle. Infact, if you look at the poster on the right carefully, you'll see that the zoo is missing an escaped lion.

* * *

For starters, here's the finished piece next to the drawing. I don't draw on white paper. Hurts my eyes ..or whatever. I draw on magic paper. It's a kind of special ordered printmaking paper that, if the company ever quits making, more than likely I'll hang up my hat.


I'll warm the drawing over with a nice layer of soft light.


Then, after coloring the face, I'll go over with some more soft light and work with the lines til I get something I think will work.


Coloring the clothes and hat. Here's a weird thing I do that when people around here ask and I try and explain it just doesn't work. I color a layer of multiply and then copy that layer. I'll take the copy and change the layer setting to soft light and then Hue/Saturation change it to a little darker and (usually) a little redder. At that point most people slowly say, "Ok. ...Why?" To me, it colors the shape and the line and I think it looks better, and warmer (or cooler in some cases) and all around good.


Shirt shirt... see SEE? Color the shirt blue. Copy the layer, turn it to soft light and make it a little redder (you get purple) and then the lines change color and it looks richer. I'm not nuts.


Brick work color, involves the same principles.


Here's the ticket. Screen. Screen is magic. Use a dark color though, it goes atomic pretty fast otherwise. While you were looking away I added a lot of shadows. Don't panic. And some more screen.


More screen...


Ok, in this one not much is changed but look at the shadows at the sections of the sidewalk. Helps to sell that there's light coming from the left.


Lighten up a few areas with more screen...


Bricks...


By now I've added some more shadow and a blue light on the back of the boy.


Here's a trick. At this point I'm thinking the face lines have got too washed out so I just copy them over from the orginal drawing to strengthen them up some.


And there you go.


My Thoughts: I like this one. It wasn't super complicated and I think I did it around an hour and half to two hours, painting time. I like the light and the feel. I don't think it's as bold as it could be, or maybe it needed to be a better pose or drawing, I don't know, I just like the light. It feels smoky to me and that's what I was after so, chalk this one up as OK.

Saturday, May 27, 2006

What's going on here

Well, this is a side blog, to light night rains, my main blog. With this, what I hope to do is to demonstrate how I work and how I arrive at my finished artwork.

Comments are super welcome, as well as questions.

Friday, May 26, 2006

All in the family...

It all starts with a thumbnail. A foolish little doodle.


Then progresses to a finished drawing, like so. To do this you need to listen to good music and put the pencil down on the paper. This is the hardest part and the easiest part, unless you are listening to Pärt, Arvo Pärt, in which case after fifteen mintues you'll seize a chair, heave toward the nearest window, dive out after it, and plummet to your doom.


Then usually I'll goof off.

Having a set of fantastic customized brushes never hurt a fly.


Now, here's the roast beef of this one.


A little coloring of the lines, just like how when I do a watercolor, I'll be sure to not use a regular pencil. I'll use a colerase brown, or Derwent Chocolate 66, to keep things from looking grim. And by grim I mean dead.


Using a normal airbrush set on multiply, I'll lay in my values. Generally in a brown.


And I'll also, multiply in some color.


Kind of an over view of things...


Now, here's the magic starting. See how that hair is red? Dig this:


You


use


Screen. Notice the old man (Isaac) and his hair from here...


...To here. Fantasic.


We're needing some light, so we need screen.


KA-BLAM-- and there was light.


The color of the background was beginning to be just a little to similar. So, with a layer of color, there you go.


Tame that saturation. That's to my liking, maybe not for everyone though.


Ready for the fridge.


MY THOUGHTS: Very quick and dirty. All in all, I painted this in about 2 hours with minimal distraction if I remember right. This isn't meant to be the greatest piece ever, just a tutorial. There's still probably another good solid hour or so in there. It's not super polished but it gets across what it needs to.

An example of a much more finished drawing, and the finished painting is much more polished.


Done and done.